

This month while trying to find some organizational items to share with you on social media, I came across some pictures of these gorgeous pantries. They are ridiculously staged, and I know this in my soul, but I still couldn’t help but feel inferior. I have a great pantry. When we moved into our house a year ago, I unpacked all of our goods into said pantry and had it organized and looking fly. I found myself just hanging out in there a little longer than necessary sometimes just to admire my work. But, alas, 12 months happened and I’m going to share a little secret with you: no one else living in my house (3 kids, 1 husband) cares what MY pantry looks like…sad but true. However, looking at these pantry pics created a stir in me I could no longer ignore and I decided to give my personal pantry a sweet, much needed makeover.
I pored over Pinterest pics looking for organization ideas. Should I use baskets, glass jars, plastic bins? Should I label everything? Should I organize by zone, or meal, or item type?Am I going to be one of those aesthetically organized people that open their pasta when they get home from the store and put it in separate containers just so it looks nice? I obviously had some decisions to make. I needed a plan so I decided to scaffold out my pantry project as follows. These 4 steps should put you on the road to having that dream pantry, or at least a cleaned up, reorganized version of that.
1. Empty and Purge
The first thing I did was empty everything out of my pantry. I then went through all the bins and baskets and decluttered. I had 2 large tubs full of party supplies, one with baking supplies, one with paper straws (I kid you not. It’s kind of a problem), 1 bin full of savory spices, 1 bin full of baking spices, a large metal container full of the kid’s artwork, and a basket filled with candy (embarrassingly, some of it was from last Christmas). From each of those bins, baskets, and tubs, a serious purge happened. And when I say serious, I mean serious. I threw away pumpkin pie spice from 2011. That was the year my son was born, he’s 8. I threw away a variety of spices including some Oregano that I bought when Britney’s, Hit Me Baby One More Time, was at the top of the charts. There was a bag of chopped pecans that I had every intention of using… back in 2013, and boxes of Jello that were meant to be jigglers but never saw boiling water. The list goes on, folks. Purging the contents of my pantry was an eye-opening experience for sure, but what was truly a palm of my hand to my forehead thought was that just over a year ago I actually carefully packed and moved all of this stuff from our old house. Who does that? Geez! Really, Toska!?
BEFORE
2. Sort
The purge still left a good amount of items that needed to be sorted and put into bins and jars and such. Sorting is an essential part of this whole pantry re-org process. I put all of my savory spices in one pile, baking spices in another, snacks, crackers and chips together, the same with cereal, granola, and bread. I had several other categories as well. Once I sorted the items, I was able to judge what type of bins, buckets, baskets, and jars I needed to complete my project. This also helped me plan an organizing strategy.
3. Strategize
This may take some math. Unless you’re really good at eyeballing you may need to measure your shelves before you buy whatever bins, buckets, baskets, and/or jars you plan to use so you will know how many to buy. You could always just do what I did and over buy, (a chronic thing I do) so you are sure you have enough, but then you’ll have the hassle of returning unused items. I propose you grab a tape measure and get to it. Once you have your measurements you can create a plan. Plan to fail if you fail to plan…is that how that saying goes? Measure twice, cut (buy) once…maybe this one is more helpful, I don’t know.
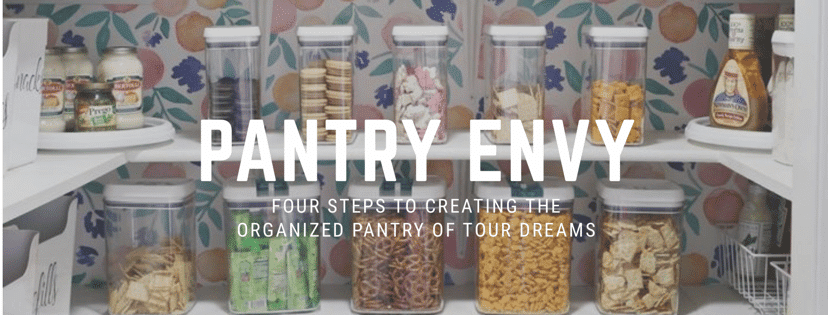
4. Organize
Once I cleaned our shelves well and put all of my pantry items in the bins, buckets, baskets, and/or jars I purchased it was finally time to get down to business. In the end I decided to organize things by item type. I now have a baking area! The best part is knowing that everything has a place, which makes putting things away much easier. I did not choose to label all of my baskets, but may do that later. It took me a minute to get everything in place because I changed my mind several times, but it was a labor of love. I never thought putting away groceries could feel so rewarding!
AFTER
I hope these steps help alleviate some of your pantry envy. You now have the tools to conquer your own messy pantry and make it sparkle. Cleaning and organizing, for me, always comes with a major sense of accomplishment and the need to move on to the next area of disarray. Now that the pantry is finished what project shall I take on next?